k8s集群部署+docker
发布时间:
更新时间:
🕒 阅读时间:3 min read
👀 阅读量:Loading...
所有节点安装Docker、kubeadm、kubectl
1 .卸载旧环境
kubeadm reset -fyum remove -y kubeadm kubelet kubectlyum remove -y docker* containerd*rm -rf /etc/kubernetes /var/lib/kubelet /var/lib/etcd /etc/docker /etc/containerdrm -rf /etc/yum.repos.d/kubernetes.repo2. 安装前准备
# 关闭防火墙systemctl stop firewalldsystemctl disable firewalld
# 关闭selinuxsed -i 's/enforcing/disabled/' /etc/selinux/config  # 永久setenforce 0  # 临时
# 关闭swapswapoff -a  # 临时sed -ri 's/.*swap.*/#&/' /etc/fstab    # 永久
# 根据规划设置主机名hostnamectl set-hostname <hostname>
# 在master添加hostscat >> /etc/hosts << EOF192.168.1.146 k8smaster192.168.1.145 k8snode1192.168.1.144 k8snode2EOF
# 将桥接的IPv4流量传递到iptables的链cat > /etc/sysctl.d/k8s.conf << EOFnet.bridge.bridge-nf-call-ip6tables = 1net.bridge.bridge-nf-call-iptables = 1EOFsysctl --system  # 生效
# 时间同步yum install ntpdate -yntpdate time.windows.com
3. 安装Docker
yum install -y yum-utilsyum-config-manager --add-repo https://mirrors.aliyun.com/docker-ce/linux/centos/docker-ce.repoyum install -y docker-ce-23.0.6 docker-ce-cli-23.0.6 containerd.io
# 启动Dockersystemctl enable --now docker
4. 配置Docker Group(必须为systemd)
cat > /etc/docker/daemon.json <<EOF{ "exec-opts": ["native.cgroupdriver=systemd"], "registry-mirrors": ["https://docker.1ms.run"], "log-driver": "json-file", "log-opts": { "max-size": "100m" }, "storage-driver": "overlay2"}EOF5. 重启Docker
systemctl daemon-reloadsystemctl restart docker6. 添加kubernetes阿里云镜像(最后支持 Docker 的 1.23 版本)
cat > /etc/yum.repos.d/kubernetes.repo << EOF[kubernetes]name=Kubernetesbaseurl=https://mirrors.aliyun.com/kubernetes/yum/repos/kubernetes-el7-x86_64enabled=1gpgcheck=0repo_gpgcheck=0gpgkey=https://mirrors.aliyun.com/kubernetes/yum/doc/yum-key.gpg https://mirrors.aliyun.com/kubernetes/yum/doc/rpm-package-key.gpgEOF7. 安装 K8s 1.23.17(最后支持 Docker 的版本)
yum install -y kubelet-1.23.17 kubeadm-1.23.17 kubectl-1.23.17 --disableexcludes=kubernetes
# 启动kubeletsystemctl enable --now kubelet
8. 部署Kubernetes Maste
kubeadm init \ --apiserver-advertise-address=192.168.1.146 \ --image-repository registry.aliyuncs.com/google_containers \ --kubernetes-version v1.23.17 \ --service-cidr=10.96.0.0/12 \ --pod-network-cidr=10.244.0.0/16执行成功后按照提示执行
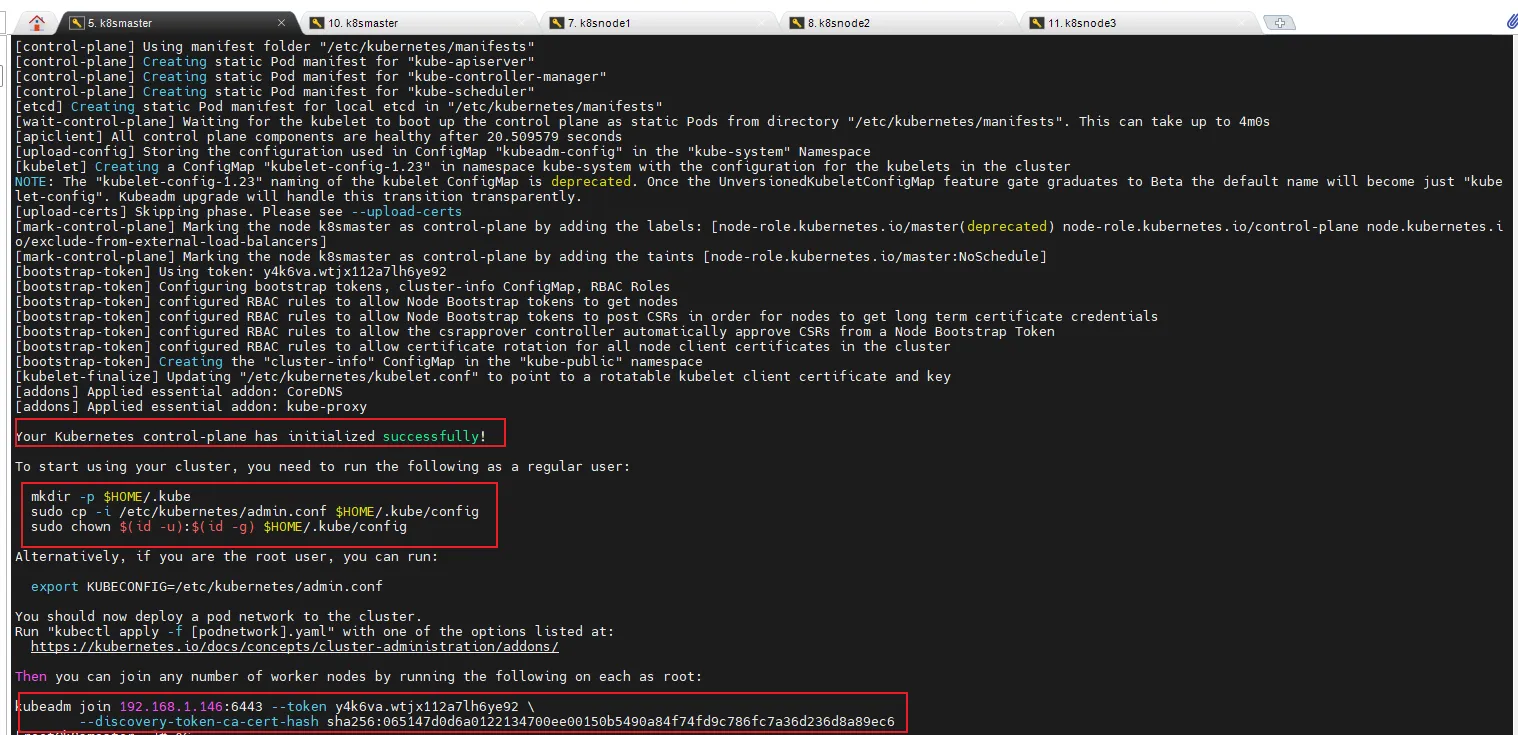
mkdir -p $HOME/.kubesudo cp -i /etc/kubernetes/admin.conf $HOME/.kube/configsudo chown $(id -u):$(id -g) $HOME/.kube/config

$ kubectl get nodes
9. 加入Kubernetes Node
向集群添加新节点,执行在kubeadm init输出的kubeadm join命令:
kubeadm join 192.168.1.146:6443 --token y4k6va.wtjx112a7lh6ye92 \ --discovery-token-ca-cert-hash sha256:065147d0d6a0122134700ee00150b5490a84f74fd9c786fc7a36d236d8a89ec6默认token有效期为24小时,当过期之后,该token就不可用了。这时就需要重新创建token,操作如下:
kubeadm token create --print-join-command10. 部署CNI网络插件
wget https://raw.githubusercontent.com/coreos/flannel/master/Documentation/kube-flannel.yml
# 默认镜像地址无法访问,sed命令修改为docker hub镜像仓库。kubectl apply -f https://raw.githubusercontent.com/coreos/flannel/master/Documentation/kube-flannel.yml
kubectl get pods -n kube-systemNAME                          READY   STATUS    RESTARTS   AGEkube-flannel-ds-amd64-2pc95   1/1     Running   0          72s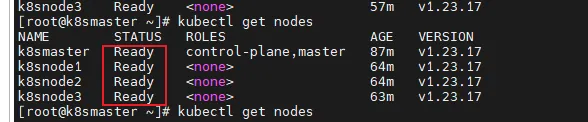
11. 测试kubernetes集群
kubectl create deployment nginx --image=nginx
kubectl expose deployment nginx --port=80 --type=NodePort
# 可以看到nginx的端口kubectl get pod,svc访问地址:http://NodeIP:Port
留言评论